The purpose of this guide is to create a multi-boot USB stick with options for Slax Linux, Hiren's BootCD, Hiren's BootCD MiniXP and Windows XP Fast Installation (from RAM).
- I take no credit for the ideas in this guide.
- It is a compilation of ideas taken from various web sites and forums.
- BIOS support for booting from a USB stick is dependent on your motherboard. There is no guarantee that this guide will work for you. I take no responsibility if anything goes wrong!
Quick introduction:
Slax - your pocket operating system
Slax is a modern, portable, small and fast Linux operating system with a modular approach and outstanding design. Despite its small size, Slax provides a wide collection of pre-installed software for daily use, including a well organized graphical user interface and useful recovery tools for system administrators.
The modular approach gives you the ability to include any other software in Slax easily. If you're missing your favourite text editor, networking tool or game, simply download a module with the software and copy it to Slax, no need to install, no need to configure.
Hiren’s BootCD
Hiren's BootCD is a wonderful live CD/USB containing various programs such as Hard drive recovery, Hard Drive Partition, Hard Drive Backup, Hard Drive Testing, RAM (Memory) Testing, System Information, MBR (Master BootRecord), BIOS, MultiMedia, Password, NTFS (FileSystems), Antivirus, AntiSpy, Process, Windows Startup, Registry tools, Windows Cleaners, Optimizers, Tweakers, and many others... As it is a bootable CD/USB, it can be useful even if the primary operating system cannot be booted. We may call it as an emergency CD/USB which every computer technician or home user must have.
Windows XP Installation
Does not deserve introduction…
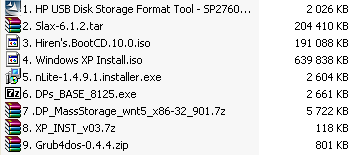
Here’s what you’ll need:
1. USB Flash drive, 1GB or larger.
2. HP's USB Disk Storage Format Tool
3. Slax for USB
4. Hiren’s BootCD
5. Windows XP 32bit Installation CD or ISO file.
6. DPs Base (for integrating SATA,RAID,SCSI Drives), BTS DriverPack Massstorage, (nLite - Optional)
7. XP INST
8. MagicISO/UltraISO
9. Grub4Dos
10. If your Windows XP ISO file is larger then 500MB, you will need 768MB or 1GB RAM to install XP from the USB Drive!
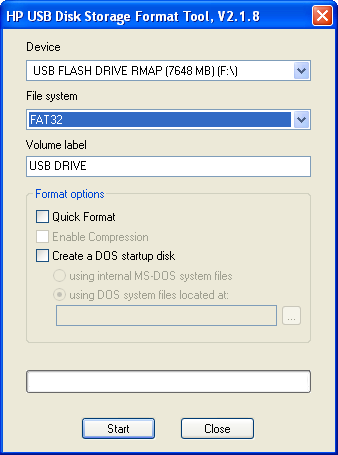
Step 1 - Formating the USB Drive
Use HP's USB Disk Storage Format Tool to format your USB Flash Drive.
Device: your USB Drive
File System: FAT32
Leave all other settings empty
Press START
Step 2 - SLAX
We will use the boot manager of Slax (syslinux) as main. Afterwards we will put a second boot manager (grub4dos) to boot Windows XP Installation and Hiren's BootCD MiniXP.
Slax for USB is distributed as a TAR archive.
1. Simply unzip it to your USB device.

2.Go to \boot\ folder and run bootinst.bat (or bootinst.sh) to make it bootable.
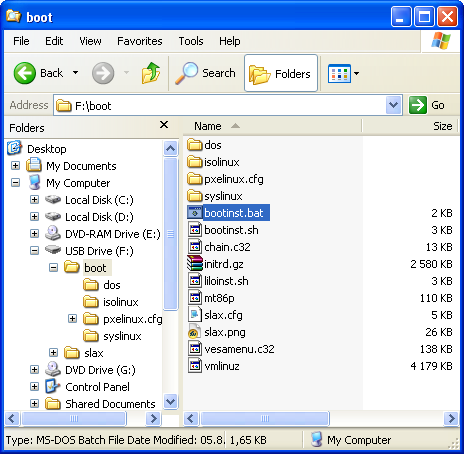
3. Restart your PC and see if your USB drive is bootable and if it boots Slax linux.
Step 3 - Hiren's BootCD
1. Extract Hiren's.BootCD.xx.iso file.
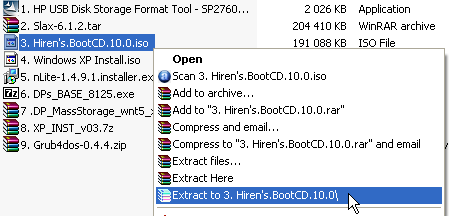
2. Copy the HBCD folder to your USB drive (Example - F:\HBCD).

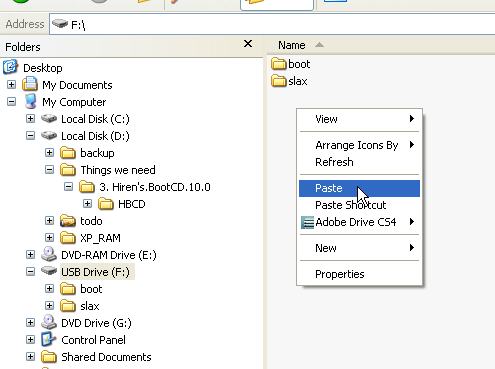
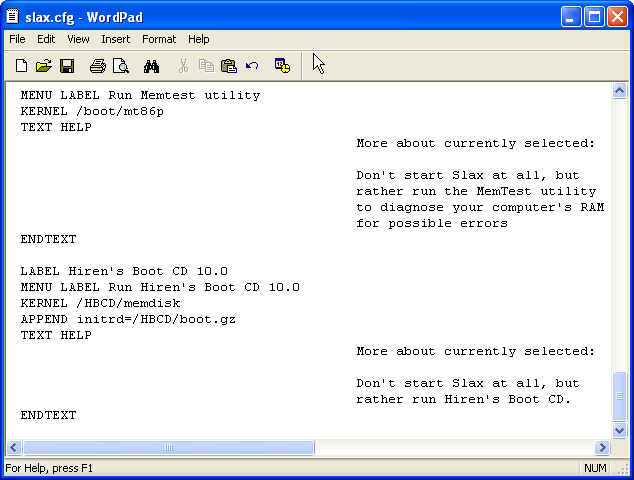
3. ADD/EDIT the following lines in F:\boot\slax.cfg :
EDIT:
TO:
ADD at the end:
Код:
LABEL Hiren's Boot CD
MENU LABEL Run Hiren's Boot CD
KERNEL /HBCD/memdisk
APPEND initrd=/HBCD/boot.gz
TEXT HELP
                                          More about currently selected:

                                          Don't start Slax at all, but
                                          rather run Hiren's Boot CD.
ENDTEXT
(Optional)
To remove the timeout:
Step 4 - Preparing Windows XP Installation ISO
If you don't have the ISO file you can download it from the Internet (recommended) or make one from a CD.
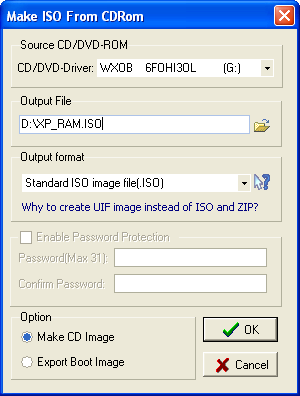
You can make the ISO file from a Windows XP Installation CD with MagicISO/UltraISO.
MagicISO can make ISO file from CD/DVD disc:
1. Click  button to show Make ISO from CD/DVD-ROM Window or go to Tools -> Make ISO from CD/DVD-ROM
2. Choose your CD/DVD-ROM driver which hold disc that you want to copy.
3. Choose output format - ISO.
4. Type output ISO file name.
5. Click OK to start.
UltraISO also can make ISO file from CD/DVD disc:
1. Tools -> Make CD/DVD Image...
2. Choose your CD/DVD-ROM driver which hold disc that you want to copy.
3. Choose output format - ISO.
4. Type output ISO file name.
5. Click Make.
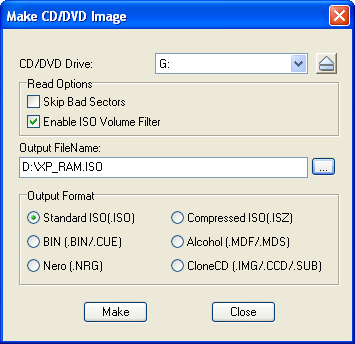
Rename the ISO file to XP_RAM.ISO
Step 4.1 (Optional - must be done before Step 4.2!) - nLite
With nLite you can integrate SP3, add hotfixes, remove components, make you installation Unattended and more.
Step 4.2 (Recommended!) - DPs Base: Integrating SATA, RAID and SCSI Drives (source)
For Installation of XP on a modern system with SATA Drives it is needed to use DPsBase.exe for Integrating in your XPSOURCE BTS DriverPack Massstorage with TXT Mode Enabled. In that case a lot of Extra RAID SCSI and SATA Drivers (about 120 extra) are Integrated.
1. Download and extract DPs Base to ...\DPs_BASE\
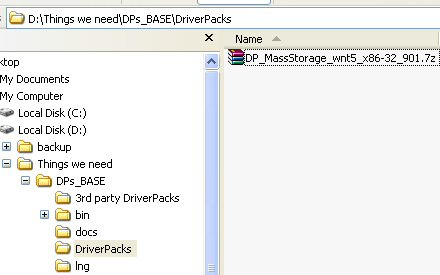
2. Download BTS DriverPack Massstorage.7z and put it in ...\DPs_BASE\DriverPacks\ folder (do not extract it, see the picture below)
3. Extract XP_RAM.ISO with WinRAR to a new folder ...\XP_RAM\
4. Run ...\DPs_BASE\DPs_BASE.exe
5. Go to Settings -> Location -> Browse -> Select the folder where you extracted XP_RAM.ISO (...\XP_RAM\). This folder must hold the I386 folder.
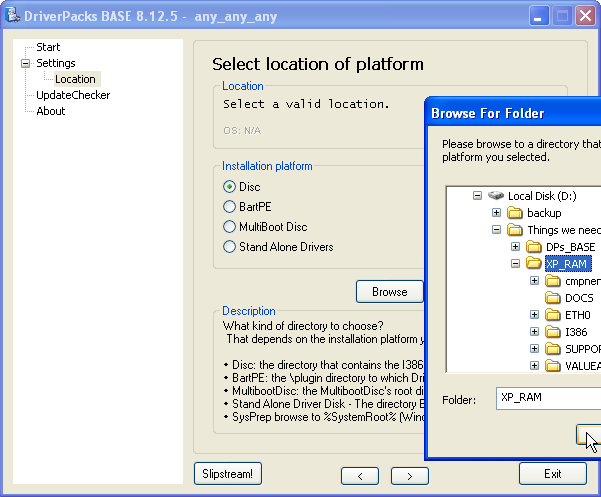
6. If everything is OK a new menu will appear.
Go to Settings -> DriversPacks™
Select DriversPack MassStorage x.xx and DriverPack MassStorage text mode.
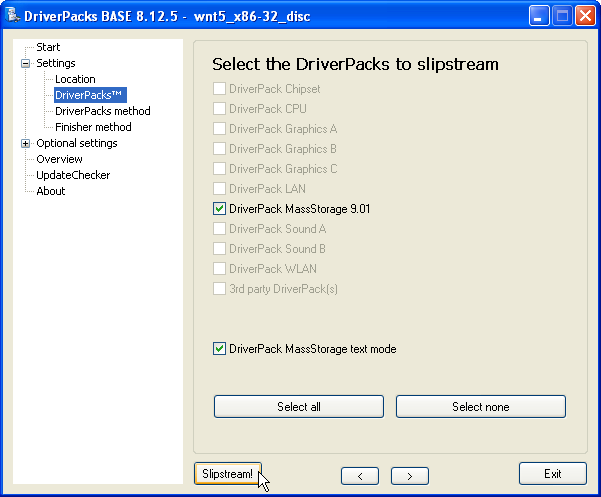
7. Settings -> DriverPacks method must be - method 2! (it is by default)
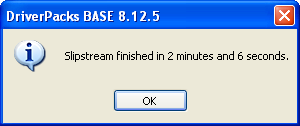
8. Press Slipstream!
Step 4.2.1 - If you don't want to add Massstorage DriverPack then... use the source!
Step 4.3 (must be done after Step 4.2.(1)!) - XP INST (source)
1. Extract XP_INST_v03.7z.
2. Open the file XP_INST.IMA with MagicISO/UltraISO.
3. Copy setuporg.exe from ...\XP_RAM\I386\ to the image file XP_INST.IMA in SETUP\I386\SETUPORG.EXE (must be upper-case).
(Optional) Copy WINNT.SIF from ...\XP_RAM\I386\ to the image file XP_INST.IMA in SETUP\I386\WINNT.SIF

4. File -> Save
5. Create a new folder in the USB Flash Drive - Inst
6. Copy XP_INST.IMA to F:\Inst
Step 4.4 - Updating XP_RAM.ISO
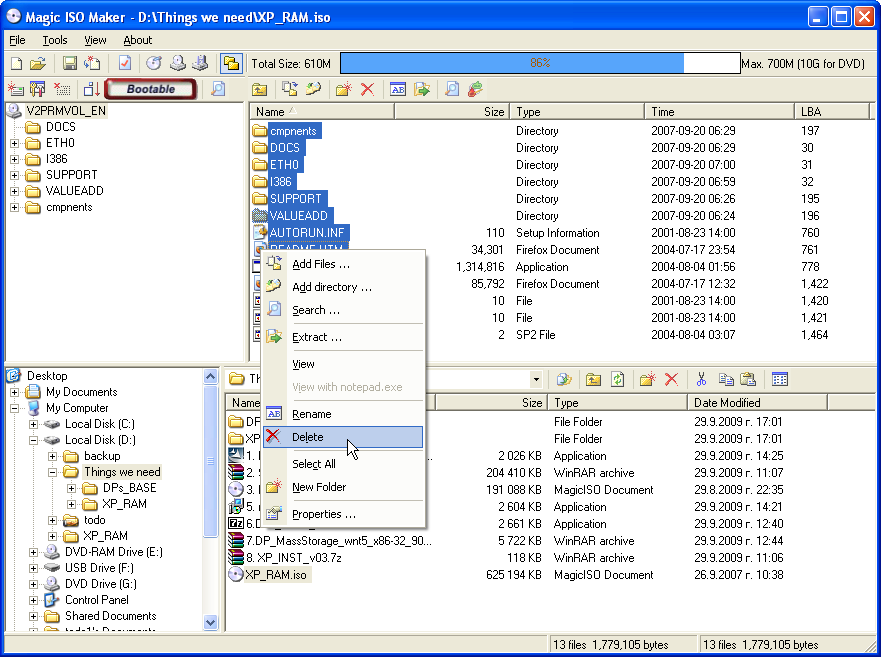
1. Open XP_RAM.ISO file with MagicISO/UltraISO, select all the files and folders and delete them. Don't close MagicISO/UltraISO.
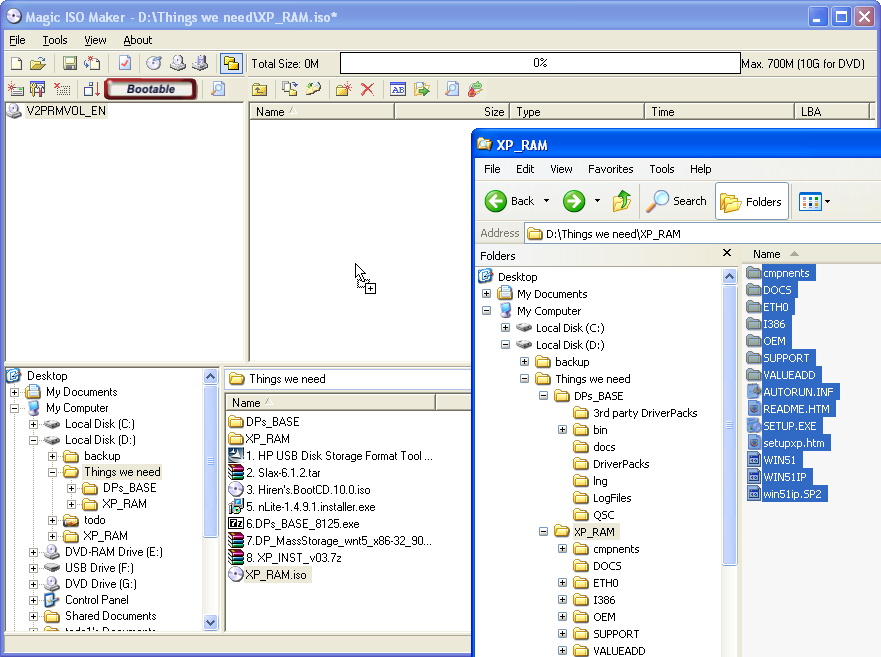
2. Run Windows Explorer, go to ...\XP_RAM\ folder (where you extracted the ISO and used DPs Base). Drag and drop all the files and folders to MagicISO/UltraISO.
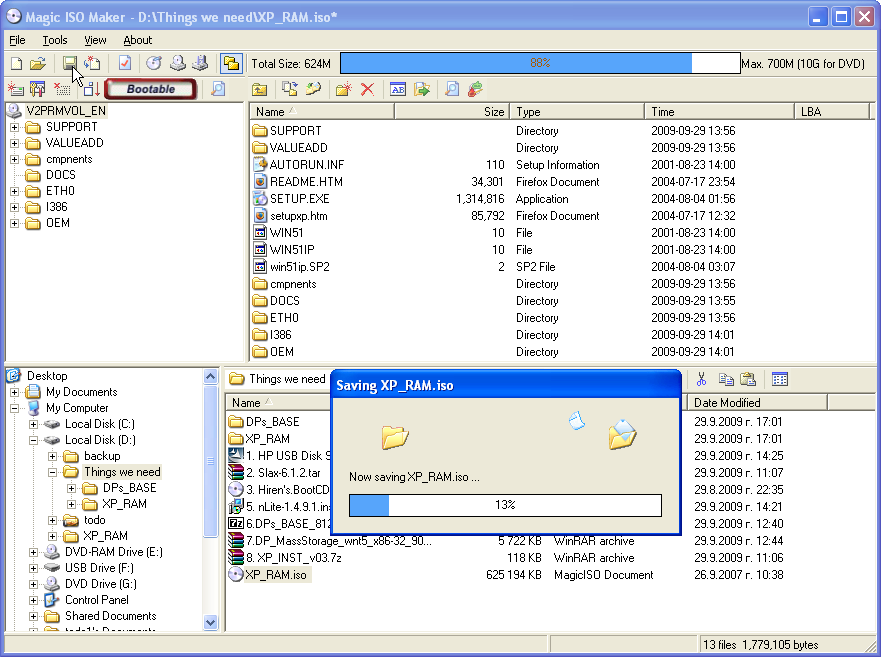
3. File -> Save
4. Copy XP_RAM.ISO to F:\Inst
Step 5 - Grub4Dos
1. Make one new folder in the USB Drive - F:\boot\grub\
2. Copy all the content from grub4dos-0.4.4 to F:\boot\grub\
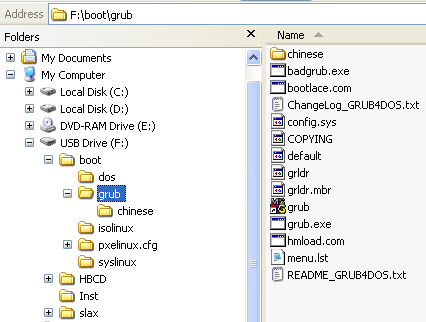
3. Edit F:\boot\grub\menu.lst :
Код:
color black/cyan light-green/cyan
timeout 30
default /default

title Loading XP RAM Install - /Inst/XP_RAM.ISO
ls /Inst/XP_RAM.ISO || find --set-root /Inst/XP_RAM.ISO
map --mem /Inst/XP_INST.IMA (fd0)
#(fd1) optional, required at some BIOS.
#Remove the # from the bottom line if you have problems with booting/installing!
#map --mem /Inst/XP_INST.IMA (fd1)
map --mem /Inst/XP_RAM.ISO (0xFF)
map (hd0) (hd1)
map (hd1) (hd0)
map --hook
chainloader (0xFF)/I386/SETUPLDR.BIN

title Mini Windows Xp
find --set-root /HBCD/XPLOADER.BIN
chainloader /HBCD/XPLOADER.BIN
savedefault
(Optional)
Put # before timeout 30 to disable it:
Maximum timeout is 3600 (6 mins).
4. Add the following to F:\boot\slax.cfg :
Код:
LABEL Windows XP Install or MiniXP
MENU LABEL Run Windows XP Install or MiniXP
KERNEL /boot/grub/grub.exe
TEXT HELP
                                          More about currently selected:

                                          Don't start Slax at all, but
                                          rather run Windows XP Install
                                          or MiniXP.
ENDTEXT
The files XP_INST.IMA , XP_RAM.ISO , SETUPORG.EXE (inside XP_INST.IMA) and WINNT.SIF (inside XP_INST.IMA) must be upper-case.
Additional resources:


 Отговори с цитат


Ще го опитам някой ден!Дано пак не оплескам нещо

Първоначално написано от overclocker
 Правила за публикуване